


|
A000066Arduino
|
x 1 | |
|
|
RED LED 5mm |
x 2 | |

|
LCD-09053SparkFun
|
x 1 | |

|
HC-SR04 Ultrasonic Ranging Sensor Module |
x 1 | |

|
SMD push buttonPCBWay
|
x 1 |

|
arduino IDEArduino
|
|

|
Autodesk Fusion 360Autodesk
|
|

|
3D Printer (generic) |
How to create a digital prototype and turn it into a product
Many years ago, developing a product, testing it for validation and launching it on the market was very expensive. Due to these costs, many technologies were inaccessible and impeded the development of new solutions for the market.
In this article, together with PCBWay, you will learn how to create a product from scratch. We will present you the project idea and the step by step to build it.
The product created will be a solution for teaching educational robotics and technology in schools.
Through this project you will be able to:
- Learn how to analyze a problem,
- Learn the process of developing an idea,
- How to turn your idea into a real solutio,
- How to carry out the process of digital creation of your product,
- How to prepare your digital files for real prototype fabrication.
All this and much more you will learn in this project developed with PCBWay. We will use your services for 3D printing of parts and manufacturing of printed circuit boards to assemble the electronic structure.
Below are some images of the project.

Now, let's start the project discussion and steps for you to create any solution.
Problem analysis and solution creation
Educational robotics is a subject that is already taught in many schools around the world. Children and young people are learning through various technological tools.
Research shows that learning programming, electronics, and robotics has a major impact on developing computational thinking, creativity, and problem-solving skills.
That's why most schools are implementing the discipline of educational robotics. However, there is a big problem: schools do not have material that facilitates learning and is cheap to build in the classroom.
One of the ways to solve this is by creating a robotic device/educational kit with the following characteristics:
be cheap,
- Easy to be programmed,
- Use electronic components that are easy to program and inexpensive,
- Easy assembly by students in classes with little time.
Next, you'll find out how to create a solution to a problem.
How to turn your problem/idea into a real solution?
Did you encounter a problem and want to create a solution for it? What's the best way to do this? Where to start?
The first thing you need to do is understand if this problem affects many people. If so, try to understand who they are: their age, work profile, what they suffer from this problem and many other useful information that can help you create a solution.
To do this, you need to do a survey with each user.
The educational kit is intended to help 2 types of audiences: teachers and students. Therefore, each has different needs.
- Teachers need educational materials that can be easily assembled, programmed with low knowledge of technology, with few parts, low cost and that present several resources to use in practical classes of educational robotics.
- Students need a kit that is friendly, fun, attractive, easy to program, small, and full of practice study resources.
Now, it's time to analyze the data and start modeling the solution.
To create a solution you must first build a prototype. It is the beginning of the process of validating your idea.
You don't need to invest a lot of money in the initial version, but it needs to have the minimum functionality so that it can solve a specific problem for your users.
After all, how can we develop a prototype?
How to develop a prototype to solve a problem
It is very important that you learn to master digital prototyping knowledge and tools. They will help you create anything. See some of them.
The Arduino, for creating the logic and control of the project,
- Electronics, for the creation of project circuits,
- Mechanics, to create the parts and structures of the project,
- And 3D Modeling with Fusion 360, to model the complete structure of the project and make the union of Arduino, Electronics and Mechanics.
With these tools in hand and analysis of the problem, it was necessary to think of an educational kit that was: friendly, attractive, simple, easy to assemble, which can be used by children and young people, which uses elements that facilitate the development of the logic of programming and, mainly, that it is something interactive with the user.
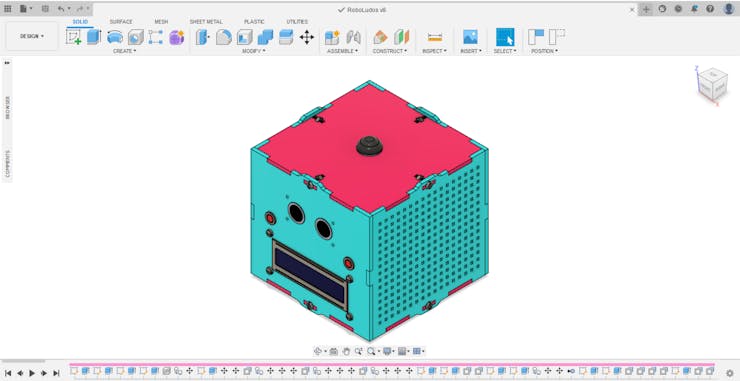
From that we used Fusion 360 and created the Ludos Robot. See some images.
Next, we will present the process of modeling and creating the solution.Como foi o processo de modelagem e cria??o da solu??o?
The first step was to define the design and format of the educational kit. Something with the shape of a robot head with sensor elements, button and LED was thought of, to be interactive and show some messages to the user through an LCD screen, and with an approximate size of a 10x10x10 cm cube.
In addition, it was decided to insert an Arduino internally into the structure of the robot's head. The objective was to facilitate programming and prevent the child or teacher from removing the Arduino to be programmed.
For this, the following electronic components were defined:
- 01 wrist button,
- 02 LEDs with socket,
- 01 16x2 LCD Display,
- 01 Ultrasonic Sensor,
- 01 Arduino UNO,
- And a Shield board for connecting devices.
With these electronic components, the child can develop dozens of activities on an electronics bench and use creativity in the classroom and at home.
In addition to the electronic components, we have the Shield board.
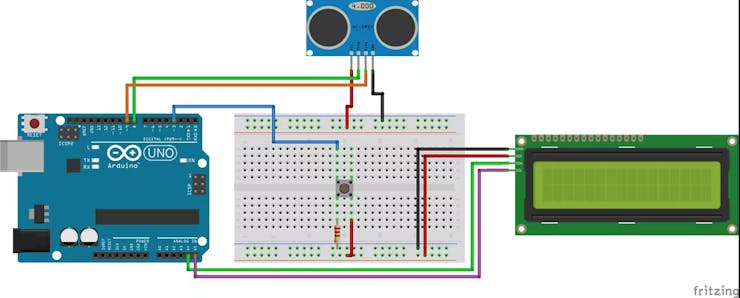
The Arduino shield board was used in order to facilitate the connections of all devices on the Arduino UNO. See the figure below.

In addition to having access to the Arduino connection pins, it also has several buses for connecting +5V, GND, Vin and 3V. This makes it easier to connect the devices and avoids soldering the same signals for connection to the Arduino.
It is available for download and you can win 10 PCBWay units.
Follow the step by step below and get 10 free PCBWay units.
Access the following link and create your account on the PCBWay website.
Download the Gerber files of this PCB.
Upload the gerber file in PCBWay website.
The figure below shows the structure of the robot with all the aforementioned electronic components.
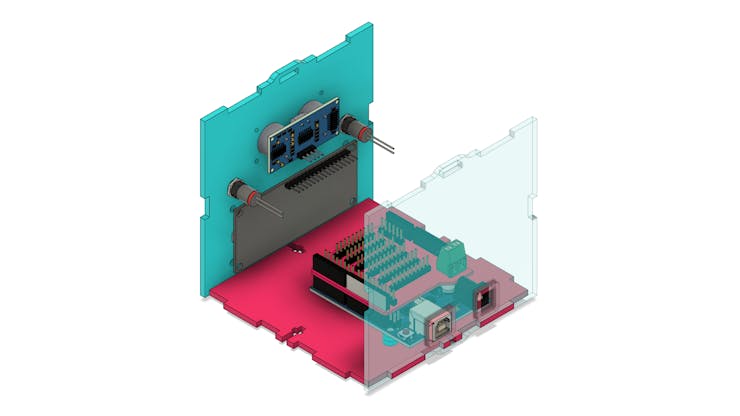
Now, look at the back of the Ludos Robot.
Strategically, the Ludos Robot has cuts for access to the USB port and Arduino power. This was used to facilitate programming and powering the Robot by 9V batteries.
There is no need for the child to assemble and disassemble several times. After the first assembly and connections of the electronic devices, the robot is ready to be powered and programmed.
All of these are strategies to make use easy, uncomplicated and to improve the user experience with the product.
What is the advantage of using Fusion 360 for modeling?
Fusion 360 is essential in projects that require modeling of mechanical parts, assemblies and integration of components and electronic boards.
Through it we can develop the complete structure of a solution.
In addition, using digital prototyping software reduces the chances of project failures. These softwares have tools that allow you to evaluate the structure, movement relationship between parts and much more.
They speed up the construction of the prototype safely and with less investment costs in the first version. Fusion 360 lets you create anything you want.
After building the digital prototype and verifying the design parts, you need to prepare the parts for fabrication.
After all, where to assemble a prototype of a product? Is this possible and accessible to anyone?
Yes, currently, you can use PCBWay's services to create any idea or product you are developing.
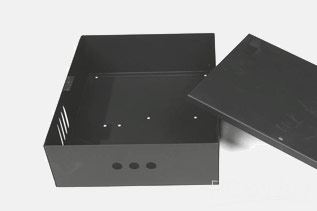
PCBWay develops electronic boards, CNC parts up to 5 axes, laser cutting, sheet metal, and injection molds.
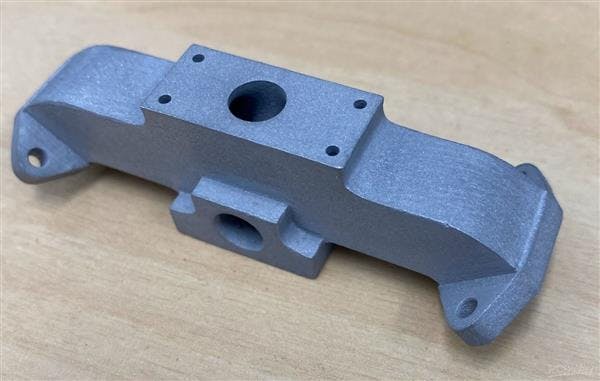
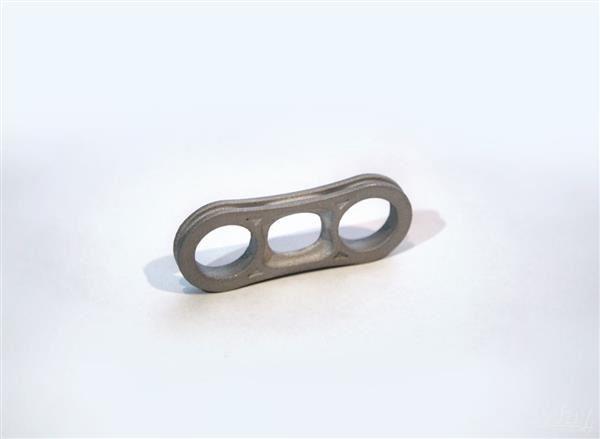
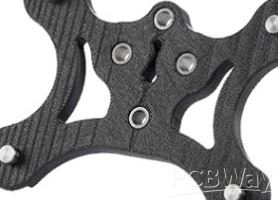
See some prototypes developed by PCBWay.

There are countless technologies, materials available and surface treatments for you to use and develop any solution quickly and safely.
What technology to use to manufacture my product?
This answer depends on several factors. Among them we highlight your audience and the final costs of the project.
As we mentioned, our target audience needs a low cost product, easy to assemble and program, attractive and resistant, because children will use it in different tasks.
For this reason, we can use two types of technology: laser cutting with acrylic or plywood material, or 3D printing.
After selecting the technology to produce the parts, you need to prepare your files for digital fabrication and send them to PCBWay.
How to prepare files for manufacturing?
There are several ways to submit a design for prototype manufacturing. We will use 3D printing technology to manufacture this project.
The site has 4 types of formats for submission:.stl,.obj,.step or.stp. We will use the.step format.
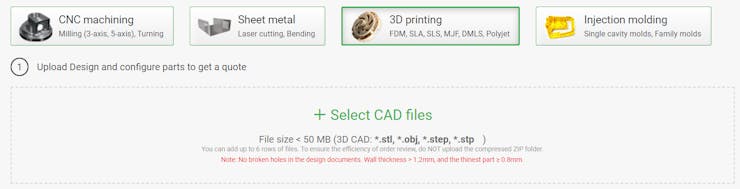
Click on this link and access the area to send files for 3D printing.
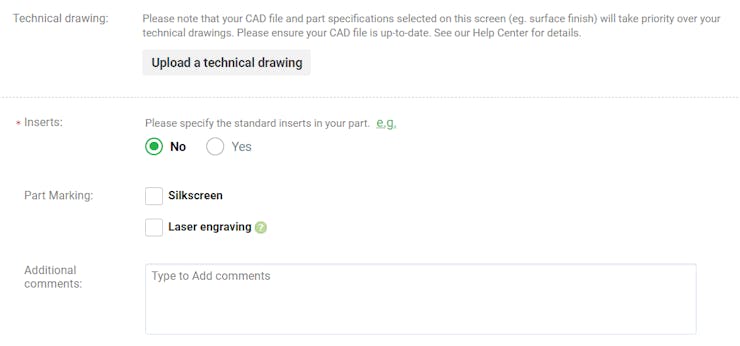
After uploading the part, you must fill in the next fields.

Inform the number of pieces, the unit of measure used in the construction of the project, the type of material and the color used.
Finally, fill in the last information and wait while the system estimates the part.
Repeat the procedure for each part of the project.
Make the payment and wait while the pieces will be produced and sent to your home.
After all, how can we program the Ludos Robot?
Control Logic and Programming of the Educational Kit
There are several types of activities that can be performed with Robot Ludos. Among them, we selected the following activity.
Develop an ultrasonic ruler with the Arduino Robot Ludos. Every time the button is pressed, the robot must calculate the distance with the ultrasonic sensor and present its value on the 16x2 LCD display.
Below we have the electronic schematic of the devices.
Below we have the complete code to solve the problem.
#include <LiquidCrystal_I2C.h> //Biblioteca I2C do LCD 16x2
#include <Wire.h> //Biblioteca de Comunicacao I2C
LiquidCrystal_I2C lcd(0x27,16,2); // Configurando o endereco do LCD 16x2 para 0x27

#define botao 3
#define echoPin 9
#define trigPin 8

long tempo = 0;
int distancia = 0;
bool BotaoCabeca = 0, estado = 0;

void setup()
{
    pinMode(botao, INPUT);
    pinMode(echoPin, INPUT);
    pinMode(trigPin, OUTPUT);

    Wire.begin(); //Inicializacao da Comunicacao I2C

    lcd.init(); //Inicializacao do LCD

    lcd.backlight();
    lcd.setCursor(2,0);
    lcd.print("Hello, I'm");
    lcd.setCursor(3,1);
    lcd.print("Ludos Robot!");

    delay(2000);
}

void loop()
{

  BotaoCabeca = digitalRead(botao);

  if(BotaoCabeca == 1 && estado == 0)
  {

      lcd.clear();

      digitalWrite(trigPin, LOW);
      delayMicroseconds(2);
      digitalWrite(trigPin, HIGH);
      delayMicroseconds(10);
      digitalWrite(trigPin, LOW);

      tempo = pulseIn(echoPin, HIGH);
      distancia = tempo * (0.034/2);

      lcd.setCursor(0,0);
      lcd.print("Distancia:");
      lcd.setCursor(0,1);
      lcd.print(distancia);
      lcd.setCursor(3,1);
      lcd.print("cm");

      estado = 1;

  }

  if(BotaoCabeca == 0 && estado == 1)
  {
  estado = 0;
  }

}
In the first part of the code, the inclusion of libraries and declaration of variables were carried out.
#include <LiquidCrystal_I2C.h> //Biblioteca I2C do LCD 16x2
#include <Wire.h> //Biblioteca de Comunicacao I2C
LiquidCrystal_I2C lcd(0x27,16,2); // Configurando o endereco do LCD 16x2 para 0x27

#define botao 3
#define echoPin 9
#define trigPin 8

long tempo = 0;
int distancia = 0;
bool BotaoCabeca = 0, estado = 0;
After that, the Arduino was initialized through the setup function.
void setup()
{
    pinMode(botao, INPUT);
    pinMode(echoPin, INPUT);
    pinMode(trigPin, OUTPUT);

    Wire.begin(); //Inicializacao da Comunicacao I2C

    lcd.init(); //Inicializacao do LCD

    lcd.backlight();
    lcd.setCursor(2,0);
    lcd.print("Hello, I'm");
    lcd.setCursor(3,1);
    lcd.print("Ludos Robot!");

    delay(2000);
}
The pins were configured as digital inputs and outputs, I2C communication to use the LCD was initialized and a message "Hello, I'm Ludos Robot!" on the 16x2 LCD.
Next, we have the loop function.
void loop()
{

  BotaoCabeca = digitalRead(botao);

  if(BotaoCabeca == 1 && estado == 0)
  {

      lcd.clear();

      digitalWrite(trigPin, LOW);
      delayMicroseconds(2);
      digitalWrite(trigPin, HIGH);
      delayMicroseconds(10);
      digitalWrite(trigPin, LOW);

      tempo = pulseIn(echoPin, HIGH);
      distancia = tempo * (0.034/2);

      lcd.setCursor(0,0);
      lcd.print("Distancia:");
      lcd.setCursor(0,1);
      lcd.print(distancia);
      lcd.setCursor(3,1);
      lcd.print("cm");

      estado = 1;

  }

  if(BotaoCabeca == 0 && estado == 1)
  {
  estado = 0;
  }

}
In the loop function, the button is read to know its status: pressed or not pressed.
If it is pressed, the code flow will enter the condition below.
if(BotaoCabeca == 1 && estado == 0)
  {

      lcd.clear();

      digitalWrite(trigPin, LOW);
      delayMicroseconds(2);
      digitalWrite(trigPin, HIGH);
      delayMicroseconds(10);
      digitalWrite(trigPin, LOW);

      tempo = pulseIn(echoPin, HIGH);
      distancia = tempo * (0.034/2);

      lcd.setCursor(0,0);
      lcd.print("Distancia:");
      lcd.setCursor(0,1);
      lcd.print(distancia);
      lcd.setCursor(3,1);
      lcd.print("cm");

      estado = 1;

  }
The Arduino triggers the ultrasonic sensor.
      digitalWrite(trigPin, LOW);
      delayMicroseconds(2);
      digitalWrite(trigPin, HIGH);
      delayMicroseconds(10);
      digitalWrite(trigPin, LOW);
After that, Arduino calculates the round-trip time of the sound wave. This time is used to calculate the distance between the sensor and the object. The code is presented below.
      tempo = pulseIn(echoPin, HIGH);
      distancia = tempo * (0.034/2);
Finally, the distance value is displayed on the 16x2 LCD display.
      lcd.setCursor(0,0);
      lcd.print("Distancia:");
      lcd.setCursor(0,1);
      lcd.print(distancia);
      lcd.setCursor(3,1);
      lcd.print("cm");
The Robot calculates the distance only once when the button is pressed. This happens because we use a control variable called "estado".
estado = 1;
When the value read from the button is zero, then the variable enters this condition and puts the value 0 in the "estado" variable. This enables the code flow to enter the button pressed condition again.
  if(BotaoCabeca == 0 && estado == 1)
  {
  estado = 0;
  }
In addition to this project, the child or young person can do dozens of other activities with Robot Ludos. See some examples that can be developed with creativity.
Suggested activities with Ludos Robot
- Create a bedside lamp with Robot Ludos. Place LEDs internally in your Robot's frame. The side holes will allow light to come out.
- Create an alarm clock using the Real Time Clock and a buzzer connected internally in the Robot structure.
- Create a system to measure room temperature and humidity.
- And many other activities.
The way presented in this article is essential for you to create any product. Follow the step and develop your solution at an affordable and easy cost with PCBWay.
Final Discussions
Developing prototypes is a sure way for you to turn your ideas into a real product. This is fully accessible and anyone can do it with PCBWay.
Make your prototype today with all the technologies available from PCBWay: electronic board manufacturing, 3D printing, CNC, sheet metal fabrication, injection molds and much more.
See some prototypes developed by PCBWay
How to create a digital prototype and turn it into a product


- Comments(0)
- Likes(0)
More by silicioslab
-
 IoT Indoor system with ESP32 to monitor Temperature, Humidity, Pressure, and Air Quality
IntroductionAir quality, temperature, humidity and pressure are essential elements to ensure healthy...
IoT Indoor system with ESP32 to monitor Temperature, Humidity, Pressure, and Air Quality
IntroductionAir quality, temperature, humidity and pressure are essential elements to ensure healthy...
-
 WS2812B RGB LED Controller with ESP8266 via WiFi
IntroductionWS2812b addressable RGB LEDs are devices widely used in lighting projects. They are foun...
WS2812B RGB LED Controller with ESP8266 via WiFi
IntroductionWS2812b addressable RGB LEDs are devices widely used in lighting projects. They are foun...
-
 Electronic Board for Cutting Electrical Power to Devices and Machines
IntroductionAn energy saving system for cutting electrical energy in machines is a fundamental piece...
Electronic Board for Cutting Electrical Power to Devices and Machines
IntroductionAn energy saving system for cutting electrical energy in machines is a fundamental piece...
-
 PCB Board Home Automation with ESP8266
IntroductionThe incorporation of the ESP8266 module into home automation represents a significant ad...
PCB Board Home Automation with ESP8266
IntroductionThe incorporation of the ESP8266 module into home automation represents a significant ad...
-
 Dedicated Control Board for Mobile Robots with Wheels
IntroductionFor a long time we developed several prototypes and teaching kits of mobile robots and w...
Dedicated Control Board for Mobile Robots with Wheels
IntroductionFor a long time we developed several prototypes and teaching kits of mobile robots and w...
-
 Traffic turn signal for bicycles
IntroductionDoes every project with electronic logic need a Microcontroller or Arduino to be develop...
Traffic turn signal for bicycles
IntroductionDoes every project with electronic logic need a Microcontroller or Arduino to be develop...
-
 Mini Arduino with ATTINY85
Do you know the ATTINY85 microcontroller? This article has news and a gift for you. Many people deve...
Mini Arduino with ATTINY85
Do you know the ATTINY85 microcontroller? This article has news and a gift for you. Many people deve...
-
 Christmas Tree
The tree used to signal light of Christmas.
Christmas Tree
The tree used to signal light of Christmas.
-
 Arduino-based development board with extra features
IntroductionArduino is an excellent tool for anyone who wants to develop prototypes. The board has a...
Arduino-based development board with extra features
IntroductionArduino is an excellent tool for anyone who wants to develop prototypes. The board has a...
-
 How to develop low-energy devices powered by batteries?
IntroductionIn recent years, there has been a major advance in the area of embedded systems through ...
How to develop low-energy devices powered by batteries?
IntroductionIn recent years, there has been a major advance in the area of embedded systems through ...
-
 Activating loads with relay via WiFi with ESP8266
IntroductionDo you want an electronic board for activating loads via WiFi that is safe against surge...
Activating loads with relay via WiFi with ESP8266
IntroductionDo you want an electronic board for activating loads via WiFi that is safe against surge...
-
 Hospital Water Tank Monitoring via the Internet
IntroductionOne of the elements of great importance for the functioning of hospitals is water. It is...
Hospital Water Tank Monitoring via the Internet
IntroductionOne of the elements of great importance for the functioning of hospitals is water. It is...
-
 ESP32 IoT Development Board with Monitoring Battery System
IntroductionToday I want to tell you what one of the biggest problems is in electronic projects invo...
ESP32 IoT Development Board with Monitoring Battery System
IntroductionToday I want to tell you what one of the biggest problems is in electronic projects invo...
-
 Control Board for 6 Servomotors based on Arduino for Robotic projects
In the last few weeks we started developing this robotic arm. It is made up of 5 servomotors. To fac...
Control Board for 6 Servomotors based on Arduino for Robotic projects
In the last few weeks we started developing this robotic arm. It is made up of 5 servomotors. To fac...
-
 PCBWay Standalone Arduino
IntroductionDo you know how the basic circuit of an Arduino works? Every Arduino has a minimum circu...
PCBWay Standalone Arduino
IntroductionDo you know how the basic circuit of an Arduino works? Every Arduino has a minimum circu...
-
 Human Machine Interface based in Arduino with ATMEGA328P Standalone
Several commercial and industrial applications require a screen system to present data and receive p...
Human Machine Interface based in Arduino with ATMEGA328P Standalone
Several commercial and industrial applications require a screen system to present data and receive p...
-
 Small Low Cost Circuit Deveelopment Board for Prototypes
In recent years I have developed numerous prototypes with Arduino. During these creations, something...
Small Low Cost Circuit Deveelopment Board for Prototypes
In recent years I have developed numerous prototypes with Arduino. During these creations, something...
-
 Intruder alert system with SMS
In several places, we must monitor the security of spaces and prevent intruders from entering prohib...
Intruder alert system with SMS
In several places, we must monitor the security of spaces and prevent intruders from entering prohib...
-
IoT Indoor system with ESP32 to monitor Temperature, Humidity, Pressure, and Air Quality
338 0 2 -
Naruto Multi-color PCB printed with UV technology
135 2 1 -
-
-
-


